List/Library Columns vs Site Columns​​​


(back to Site Owner Help)

Columns in SharePoint

SharePoint is a platform that allows a user to quickly and easily create a Site. This may be to help a team collaborate or an external site, there are many scenarios. But how do you do this? With Lists and Libraries, which are kind of "Excel" spreadsheets on the web if you like. We create a table and as we add columns to this table (list/library) we are asking whomever is entering information in it to specify certain details we call "Metadata".

columns1.JPG

However, the columns we have in a list or library can be created or added in multiple ways. Each of these ways has its pros and cons.

List and Library columns

This is probably the most popular type of column created. They're easy to create and you don't have to overthink it.

columns2.JPG  

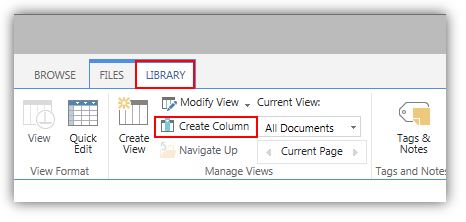
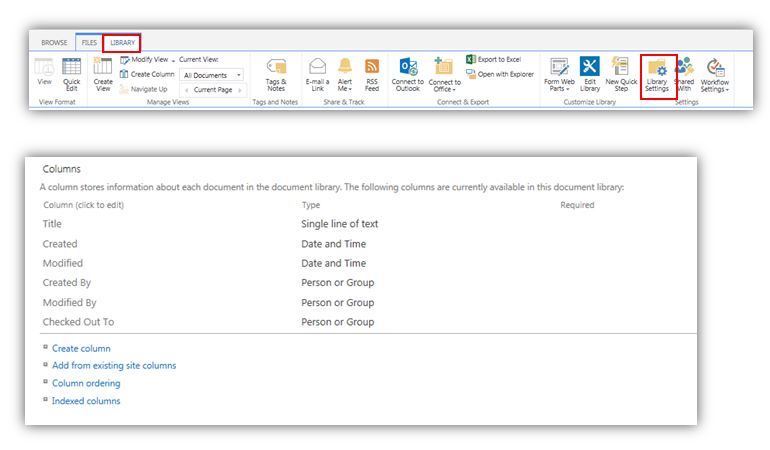
They're accessible directly from the ribbon and are available on all lists and libraries.  (or you can get to them through List/Library Settings)

columns3.JPG

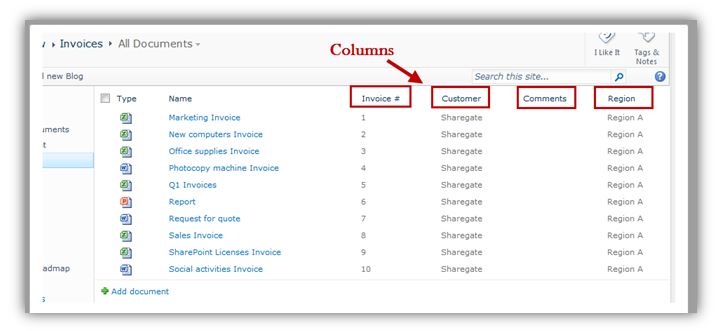
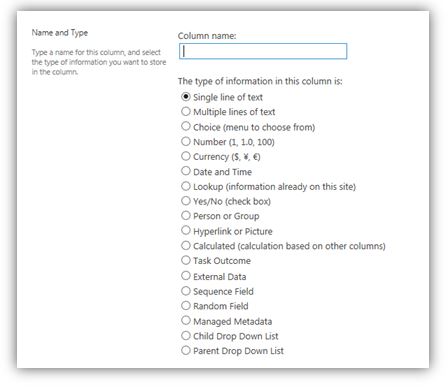
The person creating the list or library column can then choose from a list of column types to help control the information coming into the list. For example, if you're making an Invoices document library, you'll want to make sure that the customer associated comes from a verified list of customers without any spelling mistakes.

 columns4.JPG

If you are creating a custom list with multiple questions that start with the same words, you need to:

  • Create the field with keywords and no spaces. For example, DateReview instead of “If so, what was the date of the review?"
  • Save the field.
  • Go back and rename with the full question.​

Advantages of List/Library columns:

Well, they're easy to create. Within seconds the Power User can find himself in the create column menu, adding ways to control content coming in his list or library. These don't require any questioning on reusability or architecture, it's an instant consumption.

Disadvantages of List/Library columns:  

It doesn't promote reusability or help leverage what already exists in a parent site. It exists in that list or library once it's created and that's it.

A customer once had close to a 100 document libraries in a site. They all had one column that was exactly the same. They always used "Create Column" to create a library column, this made it only available in each of these libraries. What happened? Well after a couple of months, they realized that a few libraries had the column misconfigured. This was simply due to human error after repeating the same action so many times. Others realized that it was just too long to update the column with new configuration, they had to go to each library in the site one by one to edit them.

Site columns

SharePoint also offers you the possibility to create Site Columns. What are these? They are columns we create in a SharePoint site to be available to its subsites.

sitecolumn1.JPG

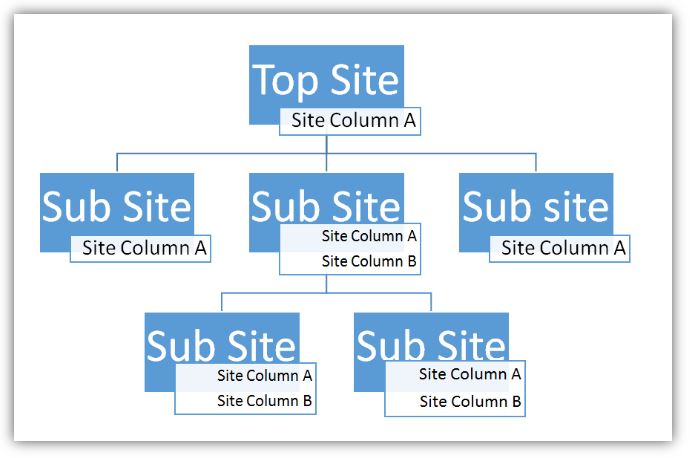
As you can see when you create a SharePoint Site Column it is available to the site and its sub-sites. This makes it very interesting for us to reuse a configuration.

SharePoint gives you a site and allows you to collaborate within it. However, if you try to interact with another site it can be very difficult. Unless you have the Standard or Enterprise version of SharePoint with the Content Query Web Part, it will be difficult for you to interact with other sites.

In some cases, it can be useful to create a Lookup Site Column so that the actual lookup will also be available in sub sites. Take the diagram above for instance, if Site Column A was a lookup column to a list of customers available only in the Top Site, then all sub sites would have the Site Column A with the lookup to the customers list in the top site.

Creating the Site Column

It is usually recommended to create the Site Column at the top site so that all sub sites and future sub sites can benefit from it. However, this may not always be the best thing to do in all cases. If you have 100 sub sites and all site columns are created at the top, you will quickly find yourself overwhelmed with columns that are not needed in most sites.

To create a Site Column you will have to go through the Site Settings and find 
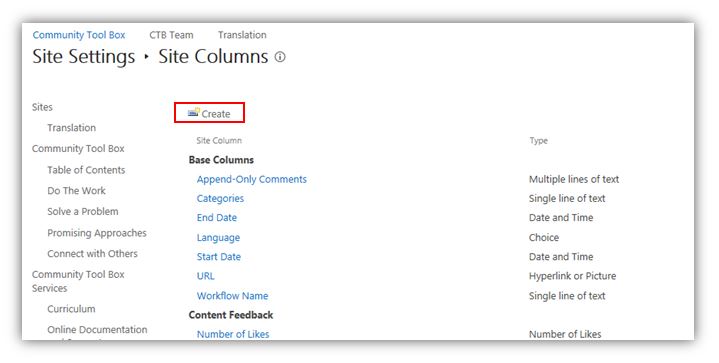
Site Columns under the Web Designer Galleries section.

sitecolumns2.JPG

When on the Site Columns page, click Create
sitecolumn3.JPG

When you create a Site Column you also have different choices than the List/Library columns.

sitecolumn5.JPG  

Most of these columns are available for Publishing Sites. They are columns used in page layouts to facilitate the entry of metadata while create a Publishing Page in SharePoint. Simply put, these are columns that are placed in a Page.

Advantages of Site Columns:

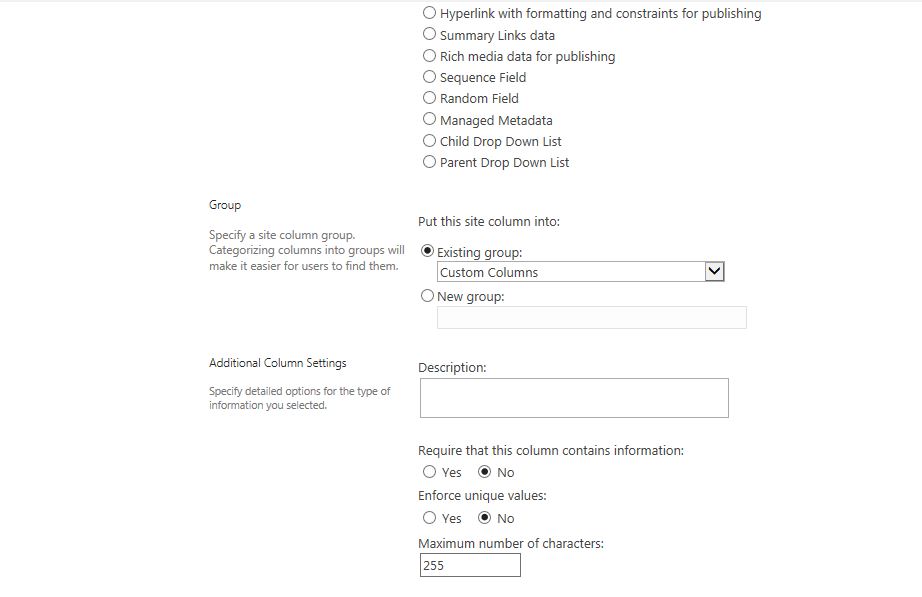
It can be reused by multiple lists and libraries within and a site and its subsites. It also helps by centralizing the configuration of the column in one place which makes it easier to update choices in a choice column for example that are used by multiple lists and libraries.

It allows all sites from a Site Collection to lookup information in a single list like a customers or manufacturers list for example.

Disadvantages of Site Columns:

It is not so intuitive to create as the list/library column and you need administrative rights to create it. If overused, it can create a chaos amongst available sub sites. It also requires the administrator to think about his columns and architecture every time he creates one.

(back to Site Owner Help)

​List/Library Columns

(back to Site Owner Help)

You will want to be able to customize your lists and make them work for what you specifically want them to do.  When you first create a custom list, it will only have the basic default columns.

column1.JPG 

To edit a column:

Click on the name of the column

column2.JPG 

and edit the column

column3.JPG 

*Note:  The Title column in SharePoint cannot be deleted, but you CAN rename it and/or make it a non-required field.

column4.JPG
 

To add a column

Click on Create column

createcolumn2.JPG
 

Name the column

namecolumn.JPG 

and choose the type

columntype.JPG 

Depending on what type of column you choose, there will be other settings you will need to set. 

*Note:  Again it’s good practice to create your column names with no spaces and then go back after they’re created to add the spaces back in

additionaltypeinfo.JPG 

Once you have your columns created, you’ll be able to make your lists work for you.  You can either add items individually by clicking new item

newitemedit.JPG        

Or edit the list in datasheet view (more like an Excel spreadsheet)

Datasheet View

datasheetview.JPG 

You can also quickly add columns right from here (without having to go to ListSettings)

datasheet2.JPG 

You can change the order of your columns

changeorder.JPG 

...and create different views so different people can look at the information in a way that makes the most sense for them.

views.JPG 

You can also export your entire list to Excel

exporttoexcel.JPG
 

   To delete a column

  Click on column name

delete1.JPG 

and click Delete

delete2.JPG
(back to Site Owner Help)

​Customizing Lists/Libraries

(back to Site Owner Help)

If you want to change any of the properties of the list/library, you can do it one of two ways:

METHOD #1

If you hover over the list with your mouse, you'll notice an ellipsis appears:

listexample1.JPG 

If you click on that ellipsis…a pop up menu will appear: 

listexample2.JPG 

Click on SETTINGS  which will take you to the list or library settings

listexample3.JPG 

Some important ones to note:

1.JPG 


This is where you can change the name (add the space back in)

2.JPG
 

and whether you want it on the quick launch or not.

*Note: After adding the space back into the name AFTER creating the list, you still have the nice clean URL.

cleanurl.JPG 

3.JPG 

Versioning Settings (click here for more information on versioning)

list10a.JPG
 

4.JPG 

Permissions for this list (click here for more information on permissions)

list11a.JPG
 

5.JPG 

Delete this list – pretty obvious – it will delete the list or library


METHOD #2 

Click on the tile itself – it will take you to the actual list

list12a.JPG 

On the top ribbon are two tabs ('Items' and 'List' (or 'Files' and 'Library' if it's a library))

list13a.JPG 

If you click on the ‘List’ tab, it will open up a ribbon.    On the far right is ‘List Settings’ (or again ‘Library Settings’ if it’s a Library) – Click this and it will take you to the List/Library Settings page.

list14a.JPG
 list15a.JPG
(back to Site Owner Help)

​The List/Library Ribbon

(back to Site User Help)   ​   (back to Site Owner help)

In the Library, we have a ribbon at the top of the page with two new tabs:  Files and Library

ribbon1.JPG 

 In the List, we have Items and List

ribbon2.JPG 

The Library and the List tab are very similar (as are the Files and Items tabs)

ribbon3.JPG 

ribbon4.JPG 

(back to Site User Help)   ​   (back to Site Owner help)

​Create a new List/Library

(back to Site Owner help)

A list is a collection of information (data) with columns or fields that define the item. Lists also include libraries, which are specialized lists, often containing documents or files categorized by columns or fields.   Lists resemble databases in structure and behavior and can be configured to filter, sort or group items based on properties.  In a WorkStation, lists can either be templates to guide data collection for specific uses such as calendars, contacts, document or photo libraries, and announcements, or lists can be configured for custom data collection unique to your group.

In order to create a list and begin storing data on your WorkStation, go to the cog -> Site Contents (or Site Contents on the Quick Launch menu)

Select the list or library type you would like to use to feature information on your Workstations.

  • List
  • Library
  • Announcements
  • Calendar
  • Discussion Board
  • Contacts
  • Surveys
  • Etc…

list1a.JPG 

Once you have selected the list or library, you will need to provide the Name of the list.​

list4c.JPG


Once you name it, it will show up in your site contents:

list4b.JPG
 

Note the nice clean url if you create the list with no spaces:

cleanurl.JPG 

Each site can feature multiple lists that serve the same function; however, each will need to be created separately with a distinct title.

Example: A contact list titled "Coalition Leadership" could be created to feature the list of leadership for the coalition and a second contact list titled "Coalition Members" could feature all coalition members.

Editing order of new item


  1. Go to the list.
  2. Click on the List tab and then select List Settings on the ribbon.
  3. Click Advanced Settings.
  4. Check to see if "Allow management of content types" is checked. If not, check it and then click OK.
  5. Go back to List Settings.
  6. Under "Content Types" click on Item (or in some instances Task).

    new_entry_list_order2.jpg
  7. At the bottom of that page click on the Column order link.
  8. Change the order by selecting the numbers to the right of each item you want to move.
  9. Click OK to save your changes.
  10. Create a new test entry to verify that the order is now correct.


​Deleting Lists/Libraries

(back to Site Owner help)

You may find it necessary at some point to delete a list or library that you have created.  To do this, go to Site Contents

deletelist1.JPG
 

Hover over the list/library that you are wanting to delete and you will see an ellipsis appear.

Click the ellipsis and a pop-up box will  appear

deletelist2.JPG 

deletelist3.JPG 

It will ask you if you’re SURE you want to delete the list/library:

deletelist4.JPG 

Click OK

(back to Site Owner help)

​Delete or Rename a File

(back to Site User Help)            (back to Site Owner Help)

1.       Click on the ellipsis beside the document you want to delete or rename.
delete_file1.jpg

2.       Click on the ellipsis that appears in that window.
​​delete_file2.jpg

3.       Select Delete to delete the file, or Edit Properties to change the name.

​ ​delete_file3.jpg

(back to Site User Help)            (back to Site Owner Help)
 

​Creating Folders in Document Libraries

(back to Site User Help) 

​In Document libraries, it may be helpful to organize and store your content in a folder. 

To store information by folder, first you must go to the Document Library and click on the Files tab on the top ribbon.

filestab.JPG 

Click New Folder. 

newfolder.JPG 

Create a name for the folder and click Save

save2.JPG 

drag1.JPG 

You can then just drag other items into that folder

drag2.JPG  

(back to Site User Help) 

​Adding Item​s to a Document Library

(back to Site User Help) 

Click on the + new document link

newdocument.JPG 

Click on the Browse button and search for the file or picture you would like to upload

browse.JPG 

Select the file and select Open.  Click OK to upload the file.

Alternatively, you can just drag and drop a file (or several files at once) from somewhere on your computer right into the document library.

drag.JPG  

(back to Site User Help) 

​Adding Items to a List

(back to Site User Help) 

When adding new documents to a list, you can either add items individually

additem.JPG 

or edit the list in datasheet view (more like an Excel spreadsheet.

datasheetview.JPG 

Click Stop when you've finished adding all your  items

(back to Site User Help) 

Exporting Custom List content to Microsoft Excel

​ Sometimes it is helpful to export the information in your SharePoint custom list to Microsoft Excel. You might want to do that so the information can easily be shared with others who don't have access to SharePoint. This is easy to do, but can only be done using Internet Explorer.​

  1. Go to the list/library you want to export
  2. Click List > Export to Excel.
  3. If you are prompted to confirm the operation, click OK.
  4. In the File Download dialog box, click Open.
  5. If you are prompted whether to enable data connections on your computer, click Enable.

An Excel Table is created with a data connection based on a Web query file. The export will be a .iqy file instead of .xlsx. The columns in the exported table are determined by the current external list view. The external data exported is determined by the filters defined on the external content type and in the external list view. ​

Exporting/downloading documents from a Document Library

​ ​NOTE: The only way you can download multiple files from SharePoint is by using "Open With Explorer" and it only works with Internet Explorer.

  1. Navigate to the document library where you want to download files.
  2. Click the Library tab on the ribbon.
    library-tab.png
  3. Click Open With Explorer on the ribbon.
    open-with-explorer.png
  4. Wait couple of seconds (sometimes, it takes up to 10 secs or so to open the Windows explorer).
  5. Once Windows Explorer opens, you can select one or more files to copy to your local drive.