​Permission Levels

(back to Site Owner Help)

Permissions allow SharePoint users to perform certain actions, such as edit items in a list or create a site. But you can't assign individual permissions to individual users in SharePoint. Instead, you group related permissions together into a permission level. Then you assign that permission level to one of your SharePoint groups.

SharePoint comes with some default permission levels that you can use, such as Contribute and View Only. But if one of those doesn't meet your needs, you can create a new permissions level. It's a best practice that you don't change the default permission levels.

To create or make changes to permission levels, you must belong to a SharePoint group that includes the permission to Manage Permissions. By default, you have this permission if you belong to the Owners group.

Best practices for permission levels

Permission levels apply to a specific site collection. This means that any changes you make to a permission level will have an effect throughout the site collection. Therefore, here are some recommendations:

Don't edit default permission levels. If you change a default permission level, the changes affect all the built-in SharePoint groups within the site collection. It can also cause confusion if you have two site collections that have permission levels with the same name, but each contains a different set of permissions.

Don't delete default permissionlevels.   If you delete a default permission level, it will be removed from all built-in SharePoint groups that contain it within the site collection. This can cause users assigned to those groups to lose critical permissions.

Assign permission levels to SharePoint groups.   You can assign a permission level to a SharePoint user, but it's easier if you assign permission levels to a SharePoint group. This can also help site performance

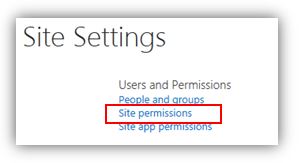
To open the Permissions Levels Page

Click Site Settings > Site Permissions

permissions1.JPG 

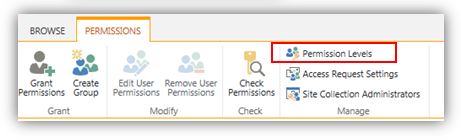
On the Permissions tab, in the Manage group, choose PermissionLevels.

permissionlevels.JPG 

Note:  You can make changes to any of the listed permission levels EXCEPT Full Control and Limited Access.
(back to Site Owner Help)

​Create a New Permission Level

(back to Site Owner Help)
It's simple to create a new permission level. You just provide a name and description, and then you choose which permissions to include in the permission level.

On the Permission Levels page, choose Add a Permission Level.

per1.JPG 

per2.JPG


On the Add a Permission Level page provide the name and the description.

per3.JPG
 

In the Permissions area, select the check boxes next to the list, site, and personal permissions that you want this permission level to include.per4.JPG

per5.JPG


Click Create.  After you create the permission level, you can then assign it to a SharePoint group.


(back to Site Owner Help)

​Create a new permission level by copying an existing permission level

(back to Site Owner Help)

A quick way to create a new permission level is to make a copy of an existing permission level. You might want to do this when the existing permission level has permissions similar to what the new permission level will have. After you make the copy, you can add or remove the permissions you need the new permission level to have.

On the Permission Levels page, click the name of the permission level that you want to copy. Be sure to click the link; do not select the checkbox next to the name. For example, Contribute, as shown here.

per6.JPG

On the Edit Permission Level page, choose Copy Permission Level, which is at the bottom of the page after the Personal Permissions section.

per7.JPG
 

On the Copy Permission Level page, type a name and description for the new permission level.

per8.JPG

Choose which permissions you want to add or remove

per9.JPG

Then choose Create.

create.JPG

After you create the permission level, you can then assign it to a SharePoint group.

(back to Site Owner Help)

​Edit Permission Levels

(back to Site Owner Help)

You can make the following changes to a permission level:

  • Update the name or description
  • Add or remove permissions

It is recommended that you don't make any changes to the default permission levels that come with SharePoint. You can't make changes to the Full Control and Limited Access default permission levels.

On the Permission Levels page, click the name of the permission level you want to edit. Be sure to click the link; do not select the checkbox next to the name.

On Edit Permission Level page you can:

  • Change the description.
  • Add or remove permissions to the level.

After you have made you changes, click Submit.

You can delete any permission level, except for Full Control and Limited Access. It is recommended that you don't delete a default permission level.

(back to Site Owner Help)

Delete a Permission Level

(back to Site Owner Help)

On the Permissions Levels page, select the check box next to the permission level that you want to delete, and then choose Delete Selected Permission Levels.

delete.JPG
(back to Site Owner Help)

​Checking Permissions

(back to Site Owner Help)

Navigate to a site or a library where you need to check permissions.  Go to Settings > Site Settings > Site Permissions and Check permissions

checkpermissions.JPG 

 Enter the email of the user you are wanting to check and click Check Now

checknow.JPG 

The permission level of the user will display

showpermissionlevel.JPG 

(back to Site Owner Help)

​Modify Permissions for WorkStation Users

(back to Site Owner Help)

In order to modify permissions for existing WorkStation users, you’ll want to add them to a group with the appropriate permissions.  Go to Site Actions, Site Settings and from the Users and Permissions column, click People and groups

Here you will have visibility to all user groups on the WorkStation. To view all groups, click Groups from the Quick Launch Menu.

groups.JPG 

In the All Groups window, click the link for the group to which you want to add users.

groups2.JPG 

On the menu bar, click New and select Add Users

newgroup.JPG 

addgroup.JPG 

On this page, in Add people to the [name of group] group, you can type the user’s email or username in the box, then select the correct entry and press Share

sharegroup.JPG 

((back to Site Owner Help)

​View Permissions for an Individual or a Group

(back to Site Owner Help)
  1. ​Go to top site where they have access
  2. Click Site Settings > Site permissions
  3. Click Check Permissions
  4. Enter user or group name and click Check Now
(back to Site Owner Help)

Assign a new permission level to a Group

(back to Site Owner Help)

If you have customized a permission level or created a new permission level, you can assign it to groups or users.

On your site, click Site Settings > Site Permissions

group1.JPG 

Select the check box next to the user or group to which you want to assign the new permission level

1.JPG 

On the Permissions tab, click Edit User Permissions

2.JPG 

On the Edit Permissions page, select the check box next to the name of the new permission level and click OK

3.JPG 

If you select multiple permission levels, the permission level assigned to the group is the union of the individual permissions in the different levels. That is, if one level includes permissions (A, B, C), and the other level includes permissions (C, D), the new level for the group includes permissions (A, B, C, D).

(back to Site Owner Help)