Managing Accomplishments
NOTE: KU Work Group staff will work with you to create your Accomplishments form. As a Site Owner you have the ability to manage Accomplishments. If you need technical assistance please contact us at toolbox@ku.edu, or by calling 785-864-0533.
Correct customization of the Accomplishment Forms is crucial for CCB management, as it constitutes the main tool for documentation in the CCB. The heart of customizing this Web Part lies in the
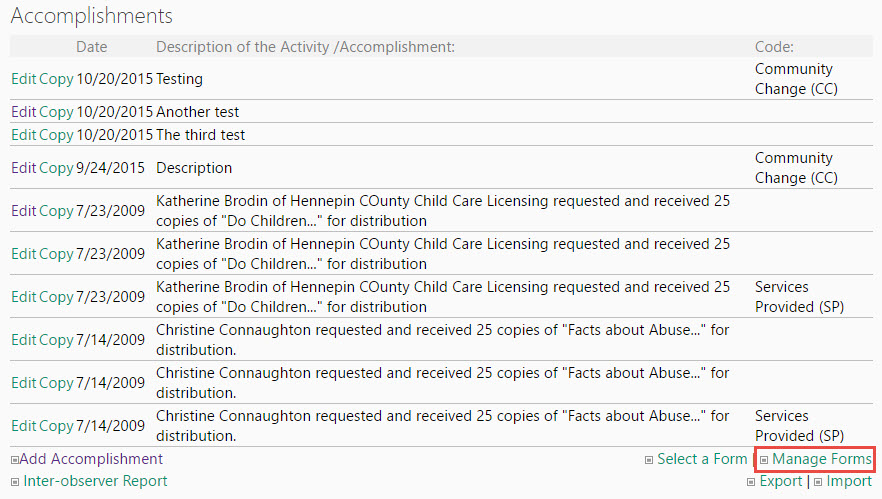
Manage Forms option. To create a new form or to manage an existing one, click on the
Manage Forms option at the bottom of the Accomplishments Web Part.
If the Accomplishments Web Part does not appear on the main CCB main page (there is an option to hide web parts) go to
Site Settings> Edit Page to view it. By clicking
Manage Forms on the Accomplishments Web Part you can either choose to create a new form or to manage an existing form. To create a new form, click
Create Form and type a title for the form. This is usually the name of the initiative plus "CCB," e.g. Centers for Disease Control CCB.
Click Submit and you will be taken to a blank form that displays all of the generic CCB fields. You will create the form in the highlighted tabs: Fields, Sections, Triggers and Help. These tabs are in proper order for this process, so it's important to create fields first, then sections, then triggers and then the help text that will appear with the individual questions.
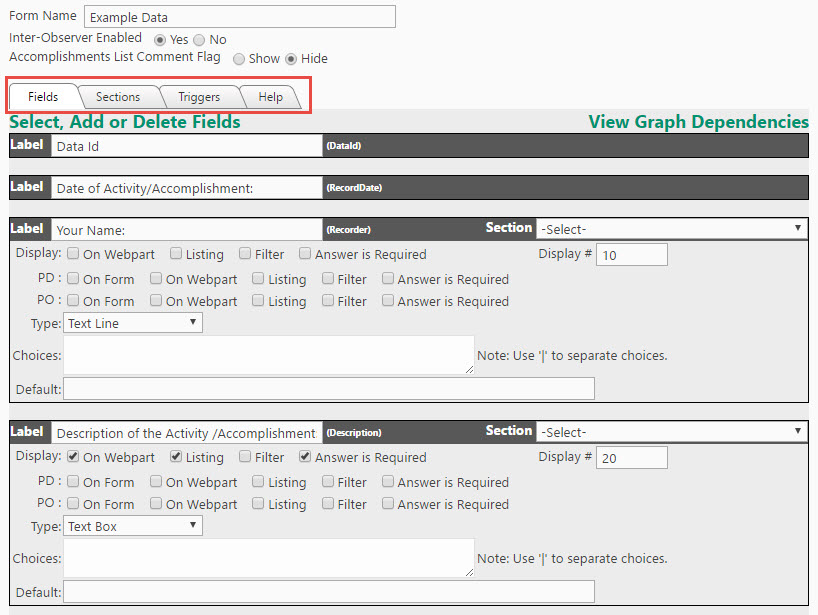
The aim of customizing your CCB form is to collect data in the clearest and easiest way possible. Form Customization allows Site Owners to choose or create the questions displayed in the recording area of the CCB, which is known as Add Accomplishments.
Form Customization Fields are the behind-the-scenes or backstage workers of your CCB database. For each question that the data entry user sees, there is a corresponding Field in the backend of the CCB Form that contains the possible preset answers for that question, and the type of question it is (e.g. open text or multiple choice). Each field in the Manage Forms area of the CCB has a corresponding question that appears in each instance of Add Accomplishments (i.e. a data entry question like What is the Organization or Program Name corresponds to the Program field in Manage Forms, or What was the primary GOAL addressed by this activity? relates to the Goal field). We call the questions that the user sees field labels.
Think of the Add Accomplishments data entry screen as a unique instance of the form that's been filled out in one of the many possible ways with the preset answers you've assigned to each field.
It is helpful to create an outline of the questions and response choices you want in your CCB before you begin modifying fields in the CCB itself. (KU Work Group staff provide assistance to help you with this task.) Think about what the initiative needs to track, and consider how you want the user to answer each question. For example, you might want to control how a user answers a given question by making the question multiple choice, which allows you to define the choices, or you might consider asking a question where the user needs more freedom to respond, and thus you would use a text line or text box to capture the user's response, whatever it may be.
After creating the form, you might find that there weren't enough default fields to capture all of the data that your initiative needs to track, or you might find that you don't have a use for all of the fields that are currently in the default form. In either case, if you need to add or remove fields, click the
Select, Add or Delete Fields link.
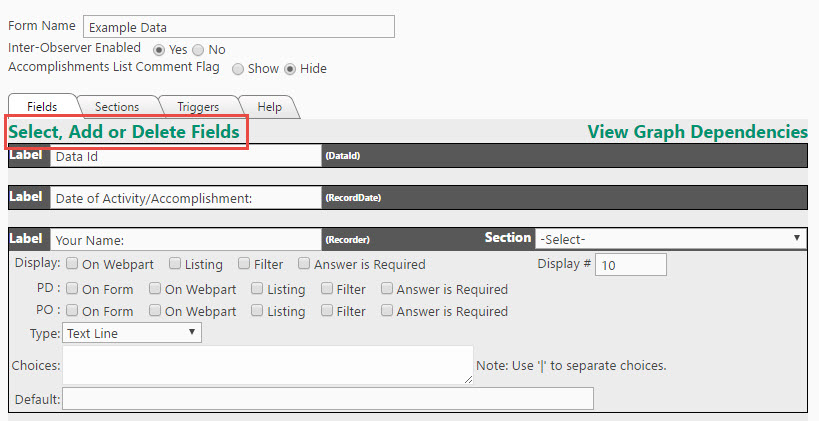
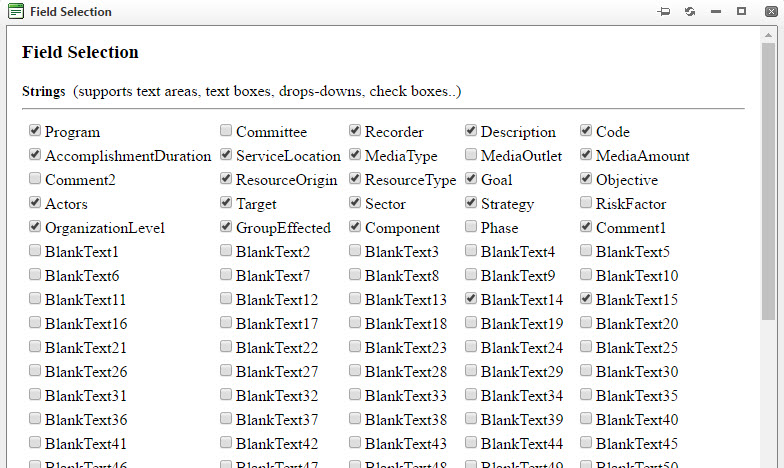


Each question on your form is associated with a field on this screen.
- To
add a field, simply click the check box next to the field name and click
Save or
Save & Close at the bottom of the window.
- To
remove a field from the form, remove the checkbox next to that field name in
Select, Add or Delete Fields and click
Save or
Save & Close at the bottom of the window.
Be sure to use
Number fields to track numerical data, and
Date fields to track dates. Conserve your text fields (under the
Strings heading) for questions with text-based choices. Use
Yes/No toggle fields to track yes/no questions.
NOTE: When removing a field, its existing information is not automatically erased, therefore it is best practice to
delete the label and display #, and set the default section back to "Select" and the display # to 0. You will do all of this in the individual field space on the Form Customization
page (i.e., the
Fields tab). This practice ensures that when the same field is added to the form again, it is not pre-labeled, and therefore easier to find and identify.
The Form Customization page displays a list of buttons at the bottom that you will use to save your forms or export them as templates to use in other CCB Sites.

-
Save and Return saves edits made to the Form, and takes you back to the Manage Forms page.
-
Save and Reorder works as a refresh button for the Forms. Use this option to update any changes made to the
Sections and
Triggers tabs, and to save your work. Use it frequently.
-
Download Template is one of the most useful resources inside of the Manage Forms option. It will save the code of the forms you build in a text file, with all Fields, Sections, Trigger, and Help configurations preserved. It is especially helpful when you want to develop a master form template to be used in several CCB Sites. Just click on
Download Template when you are finished building your form and a window will pop up asking you to either Open or Save the file. Save it to your computer, and you will be able to upload it into other CCB Sites with the
Load Template button.
-
If you download a template (coded text file named Accomplishments.xlsx), you can upload it to another site, and the Form Customization process is completed for you. Click
Load Template and browse to the file you want to load. Click on
Import file.
-
Back will take you back to the Manage Forms page, without saving any changes.
-
Delete will
delete the form completely.
-
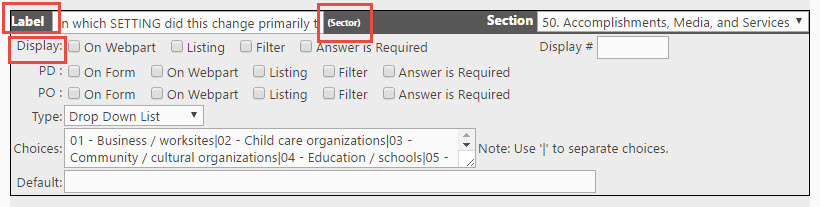
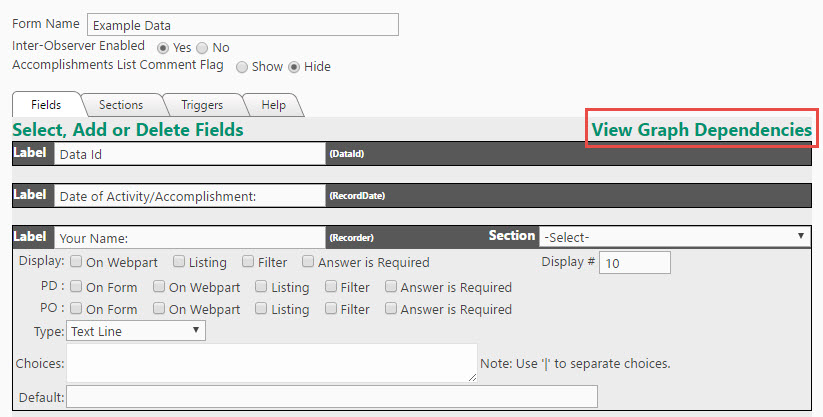
The
Label is used to customize the display text that data entry users will see. It is recommended to display the main word or phrase of the sentence in uppercase letters to emphasize the field value.
-
The
Field name is displayed in parentheses next to the Label text. When you go to Select, Add, or Delete Fields from your CCB Form, you will see the Field name, not the Label text. Try to use fields that correspond to your intended label, i.e. use Sector (as in the image above) to track geographic data, not the name of the recorder or data of the event.
-
In the
Display settings,
- On Webpart shows this question with its most recent answers on the CCB home page inside the Document Accomplishments Web Part.
- The
Listing option displays this question and all of its answers on a separate Document Accomplishments page (not to be confused with the Document Accomplishment Web Part on the main page).
- The
Filter option allows the question's answers (result values) to be used as a filter for the Document Accomplishments listing page, and the Graphs feature. For example, when revising the information, a researcher may want to filter a question, and only see the data entries that contain a specific result, or when the researcher wants to graph the number of times an answer was chosen.
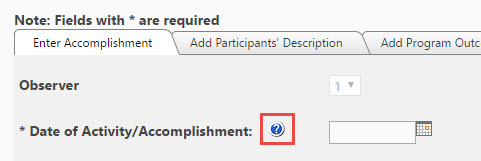
- Answer is Required means an answer to this question must be made in order for the entry to be saved. If a user attempts to save it without answering, the text “Invalid Entry” will be displayed in red. On the front end, this question is also displayed
with an asterisk, so a user can tell that it’s required.
-
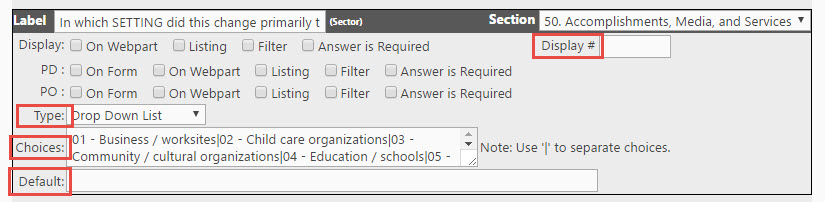
With the
Type feature, you can select how you would like to present the choices to answer the question. You may choose between the
Yes/No, Drop Down List, Text Box, Text Line, Multiple Choice List, Radio Buttons, and
Check Boxes options.
- NOTE:
Type should be determined by how much control you need to exert over your answers. The Open Text
Type offers more freedom and leeway to the user, but you will not be able to use this content on a graph. Multiple choice lists and check boxes allow users to select more than one answer, while radio buttons and dropdown lists allow for just one answer, etc. offering a researcher more control over what the user can input into the form.
-
In
Choices you should list all the options to be displayed to the user answering the question. Between options, use the “|” symbol (Shift + backslash, located above Enter) to separate them, and do not include spaces between before or after pipes “|”. Also, do not use the “|” after the last option, as it will create an unnecessary blank choice. Open Text and Yes/No Question
Types will not allow you to add choices.
-
With
Default, you can create a default answer to be displayed initially when adding an Accomplishment by writing it in.
-
The
Display # indicates the order in which the option will appear on the form. It is important to notice that the order functions are confined to each section. That means if two questions have the same display number, the first one to appear will be the one located inside the first section by alphabetical order. (The question with display number 10 inside Accomplishments will go before the question with display number 10 inside Media, because A goes before M. Sections are also in alphanumeric order.) By default the questions that have no section, which is the “Select” section, will go before any other questions on the form. We will cover how to create and manage sections shortly.
The order of your questions is determined by the order of the sections on your form. Section order is determined by the Section Name entered either in alphanumeric order, or by weight, which can be added separately to any section. We recommend either naming or weighting sections in numerical increments of ten. This allows sufficient space if you need to return to form customization and insert a section or number of sections between existing sections.
For example, if we name our Accomplishments section
10. Accomplishments, and our Media section
20. Media, and we decide we want to track data related to Organizational Change only, we would still have numbers 11 through 19 available to add that Section and create the desired ordering in within our form and end user data entry pages.
Some things to remember about alphanumeric ordering:
- Numbers precede alphabetical titles.
- Remember to add a zero before single digit numbers in the title of a section. The first number in the title will determine the order, not the actual numerical value assigned (e.g. if you create a section called
1. Accomplishments will come after a section title
.05 Accomplishments.
- You can mix numbers and letters (1.b, 1.c, 1, d, OR Z.1, Z.3, Z.4 . . . )
- If you choose to number your sections, start at 10 and number by 10s to leave room for possible future sections.
- If you decide to assign weights to your sections, in addition to or instead of numbering, you should also start at 10 and weight by 10s to leave room for possible future sections.
NOTE: Sections without weight appear in alphanumeric order following all sections with weight. In other words, weight overrides alphanumeric Section Names.
Sections are helpful for more than just ordering questions. The trigger system relies on sections. A trigger allows an additional subset of questions to display when a specific section is referenced. For example, assume you create a section called "Ice Cream." If you answer
Yes to the "Do you like ice cream?" question in that section, a trigger could make additional questions like "What is your favorite flavor?" and "What is your favorite brand?" appear. If you say
No then you would not see these questions.
NOTE:
Triggers point to sections, not individual questions. So if you want just one question to trigger additional questions (like our ice cream question above), you would have to create a new section for just that question.
Every field is housed in a section. Navigate to the
Sections tab located near the top of the Manage Forms page. This tab will allow you to view the default sections created by the system: Accomplishments, Media, Resources, and Services.
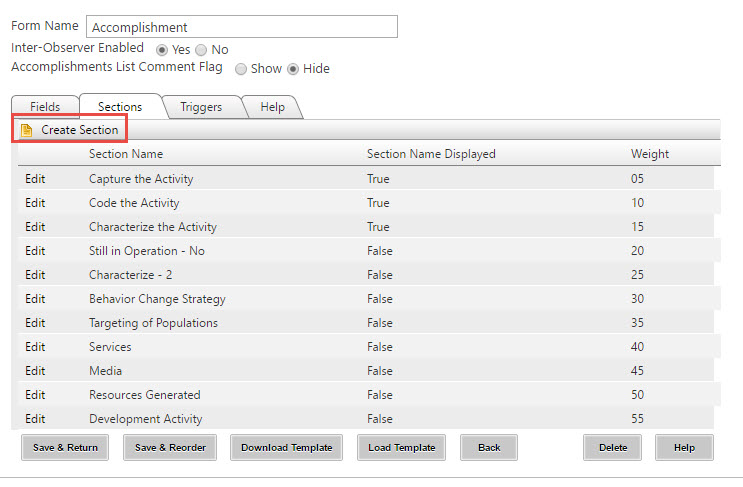
As previously stated, if you want to create a new, non-existing section or to combine select default sections, you will need to create a new section.
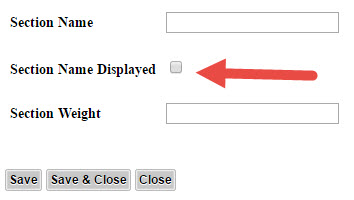
- Select
Create Section from the Sections tab, and type the
Section Name in the provided space.
- Check the box next to
Section Name Displayed if you would like to be visible as a divider/header on the form.
- Add the
Section Weight for the proper order on the form.
- Click
Save & Close.
To
Edit the title of an existing Section, simply proceed to the
Sections tab and click the
Edit link to the left of the Section Name.
Triggers are a tool of the CCB system that will, as the name specifies, "trigger" a section when an option, previously configured to activate it, is chosen by the data entry user. That is why it is important to place relevant questions in relevant, associated sections (e.g. questions about resources generated or donated time go in the Resources section). The main use of triggers will be with the Code Field (i.e. the
Community Change (CC) code will activate the Accomplishments section and all of its relevant questions, and may also activate new, combined sections like Accomplishments and Services, or Accomplishments, Media and Services; the code
Media (M) will activate the Media section or any combined set of sections that contain relevant questions; and so on).
To add a new trigger, click on
Add New Trigger, and wait for the window to pop up.
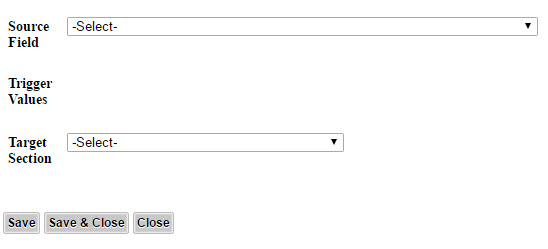
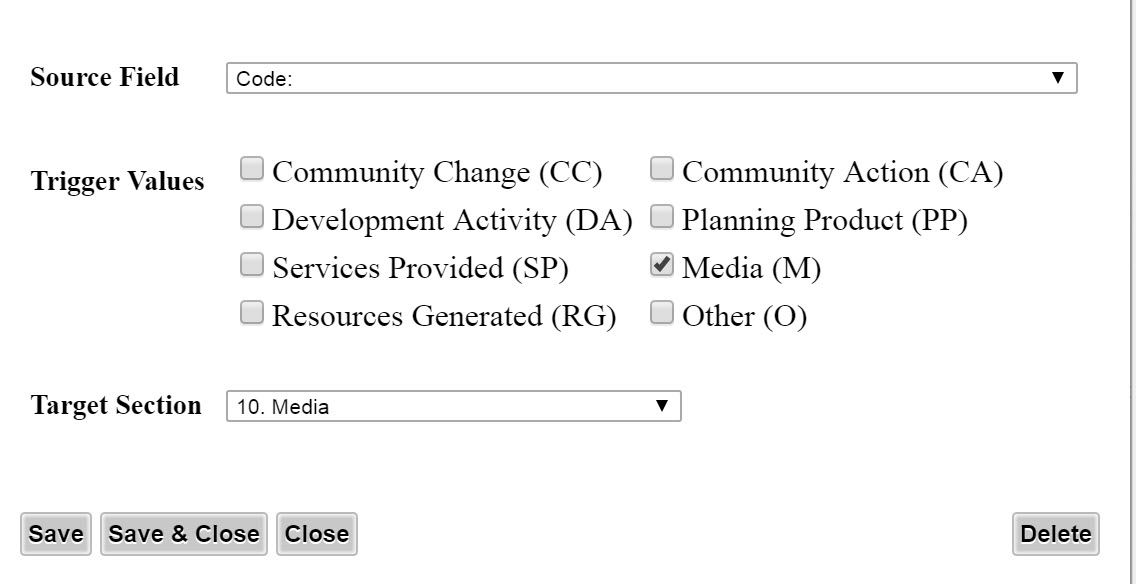
Choose your
Source Field, which is the question you want to associate with the trigger. You will see the list of questions appear in the dropdown. In this example we use the
Code field, as it is going to be the most used option. Now select the
Target Section and check the boxes for which codes you want to activate that section. In this case, we use Media (M) for the
10. Media section. You can create triggers that display the same questions for multiple selections if needed.
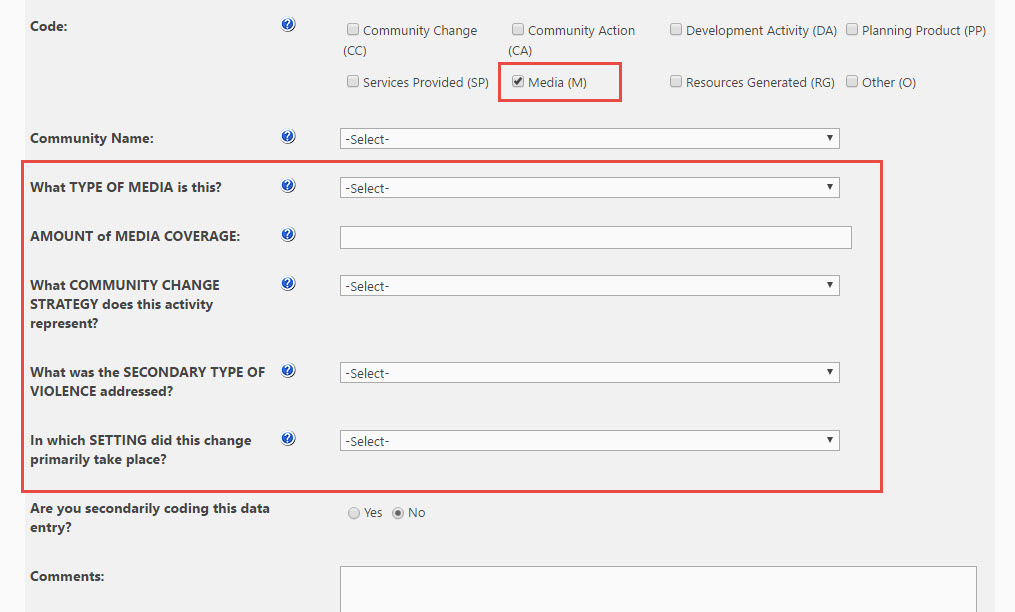
This is the way the trigger will work when a user chooses to
Add an Accomplishment and selects Media. All of the questions relevant to Media will be displayed on the entry form. If the user chooses a different Code then different questions will be displayed.
Some of the questions you added to your form might need additional clarification to help the person completing the form enter the correct information. You can easily add text to help them. To create help text:
- Click on the
Help tab.
- Locate the question where you want to add help text and click on
Edit.
- Type or paste the text in the box. If you are pasting from Word, use the "Paste from Word cleaning fonts and sizes" option shown in the image below.
- Click
Save & Close.
Here is an example of what you might enter:

The person filling out the form will see the help text when s/he clicks on the "?" shown here:

If you click on the
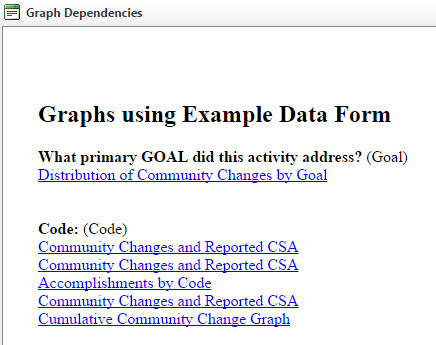
View Graph Dependencies link at this point it will be blank. Once you begin creating graphs this window will display a list of all the fields that are being used on those graphs. If you need to delete any fields from your form later check here first to make sure that those fields are not being used on your graphs.
When you created your form, you had the choice of checking Filter for each question you added. If you checked that box then you will be able to use that question as a filter on the Accomplishments listing page, and when you are creating and editing graphs.
To use filters go to the Document Accomplishments listing page. You can get to that page by clicking on the
View Accomplishments button or the
Accomplishments heading (what you see depends on how your site is setup) on your main page. Then click on
Show Filters below the CCB Home button.
You will see a list of all the questions that you checked to be used as a filter.
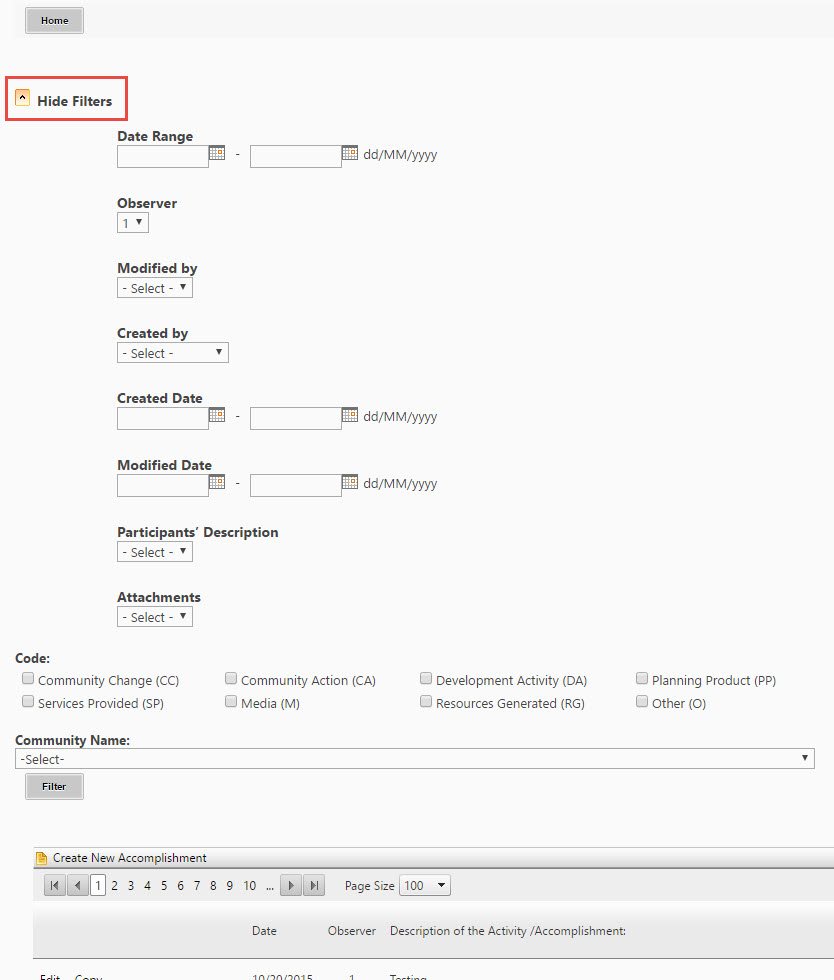

Complete the
Date Range and select any other options that you want to use to filter your data. Only want to see the information for the "Physical Activity" goal? Then select that and click the
Filter button to see those entries.
Users entering accomplishments have the ability to attach a file that is associated with the accomplishment they are creating. To view attachments:
- Go to the Accomplishments listing page.
- Entries with a paperclip indicate a file is attached and available to be viewed. Simply click on the paperclip to be taken to the page where the supporting document is available.